Correctly sharpening a knife will bring out the full potential of the blade, your cutting tool will perform to the best of its ability to the task you set it to.
The Sharpening tools
Choose your abrasive that suits the task you are trying to achieve (Whetstones, Oil Stones, Diamond Plates and Strops)
Water for soaking your water stones in or oil for oil stones, this helps minimise the metal swarf from scratching the blades surface as it builds a slurry on the bevel to contain the mess.
Masking tape to protect the blade while being clamped and from scratches
Digital angle cube for setting the desired angle when sharpening
Magnifier with a good magnification or a cloth to check for a bur
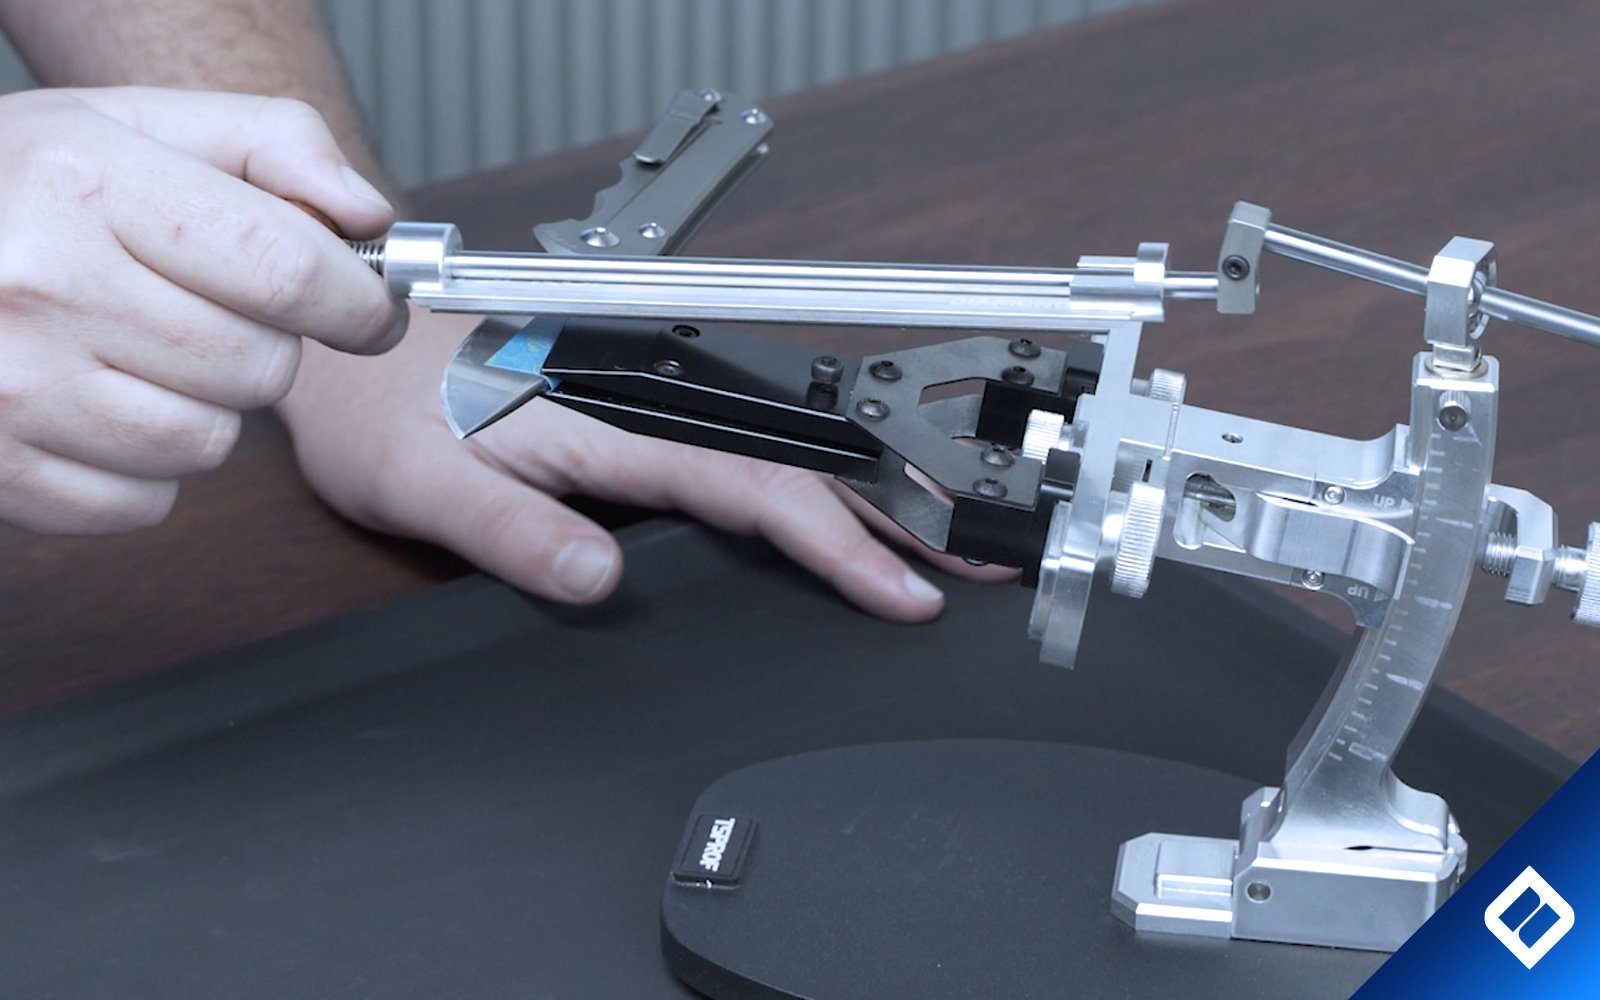
Guided sharpening system like the K03, Kadet or Wicked Edge
Using a range of abrasive stones in grit progression to achieve better results
- Extra Coarse 120-180 for the formation of the edge.
- Coarse 220-400 to reach the angle.
- Medium/Fine 500-800 for the final output of the angle.
- ExtraFine 1000-1200 for sharpening the “razor” edge.
- Polishing 2000 - 10,000 for mirror edges
- Stropping 10,000 - 600,000 for high mirror polish and crazy sharp edges
The choice of the cutting material must be based on the hardness of the blade, the purpose of the knife and the steels capabilities.
Aluminium oxide abrasives are well suited for mild steel knives - hardness below 58 HRC (Rockwell hardness) - these are knives for which flexibility is important. For example: hunting and skinning knives, poultry cutting knives, chef knives and fillet knives.
Aluminium oxide abrasives are less productive with steels of 59 HRC and higher (knives designed for high loads and aggressive cutting, for example, for cleaning and skinning of large animals) Silicon carbide abrasives work best with these steels.
Diamond abrasive stones - suitable for powder steels, mono steels (steels with a uniform chemical composition), hardened for high durability.
Diamond sharpening stones usually give an aggressive cut and high durability, therefore it is often used for hunting knives.
It is possible to work with diamond stones and plates on soft stainless steel, but the wear on your stone will be higher. These stones are more expensive, but they provide the desired level of sharpening faster and retain their properties longer. Be careful - the grain size of diamond abrasives is indicated in microns.
The Sharpening Process
Preparation of your knife is crucial to the success of your sharpening job.
Tape up your blade leaving the bevel area free for sharpening, Taping the blade will protect it from scratches and any marks from clamps during the sharpening process.
Decide on the sharpening angle as this is critical to the performance of the blade.
You can either match the factory bevel or fully reprofile the bevel to your desired angle, Typically most blades are sharpened between 15-25 degrees per side (DPS), Knives like hunting and skinning knives tent to perform best at angles of 21-25 DPS as it give more structure behind the cutting edge to last longer with hard duties.
Which will give you a sharper blade but has more chance of chipping.
Angles of 18-20 are saved generally for culinary tools like chefs knives, Fillet knives, Paring knives and Santoku blades.
Set your angle using the digital angle cube or use a pre-set guide like on the TSPROF K03 and Wicked Edge 320 Pro systems.
Sharpening and Finding The Burr
If the blade you are trying to sharpen is damaged or is completely blunt then reprofiling the bevel may be the best way to start out fresh and with a controlled angle.
Reprofiling generally requires abrasives with a low grit count (50-140) as these will do the hard work of metal stock removal.
If the blade is of decent quality and the bevel is ok but requires minor fixing then a higher grit stone may do the job.
Usually, stones with the ceramic, organic, magnesium type bonds are used with the water (they must be lubricated with clean water and a soap-water solution, or even soaked in water before sharpening for 10-15 minutes).
The stone will be ready when the bubbles stop on the stones surface.
Metal bonded diamond plates, Arkansas, synthetic resins bonded stones are often worked with water. Some diamond abrasives and abrasives made from natural stones are used “dry” so do not require any lubricant.
There are some exceptions. For example, Norton India stones are ceramic bonded and designed for oil lubrication.
Therefore, the choice of the lubricant should be based on the recommendations of the stone manufacturer.
The abrasive should move across the cutting edge (not along!) during sharpening in a forwards and backwards scrubbing motion, making sure to use the entire length of the stones surface to prolong the life of the stone.
The burr will form on the back of the cutting edge and show you that you have worked that side enough. A burr is a thin, rough layer of metal that appears along the bevel. It can be seen using a magnifier, felt with your fingers or checked with a non-woven cloth - if there is a burr, it will catch a cloth while moving along the cutting edge. Start with scrubbing 1-2 minutes per side when trying to find the burr.
After the burr appears, flip the knife over and start sharpening the other side. With the same scrubbing movements till a burr is formed on the opposite side.
Be careful removing the previous burr. Sometimes it just shifts to the other side, if you turn the knife over too early it may impact the overall sharpening job.
Refining The Angle
once the major reprofiling or angle setting is complete, the next step is to refine the bevel with finer grit sharpening stones, working in grit progression using the same steps as previous setup.
Sharpening till a burr is formed then flipping the blade over and repeating.

Grit progression is vital to the quality of the produced edge, jumping to many grits ahead will leave scratches and deep valleys that the higher grit stone cannot remove.
Finishing The Sharpening Process
Once the highest stone of choice has been used on the blade and the blade feels razor sharp, we progress to using different strops with strop emulsions to achieve a higher level of sharpness and remove the micro sized burr that remains on the blades bevel.
Applying Poly Diamond Emulsion to the strop will impregnate the strop with a very fine diamond powder, this strop whether it be a Nano cloth from Jende Industries or Leather it will carry the Diamond particles and act much the same as a sharpening stone, the only difference is the way a strop is used against the bevel.
The process of Stropping requires the strop to only sharpen in a direction that doesn't cut into the surface.
swift smooth trailing strokes are required, never use leading edge strokes (pushing towards the cutting edge) as this will cut your strop and ruin it.
For more detailed information about stropping read the article here